
Sauerkraut, directly translated as “sour cabbage,” is finely cut cabbage that has been fermented through the action of various types lactic acid bacteria. This traditional method of food preservation creates a “live” food, filled with beneficial “probiotic” bacteria that populate our gut and keep us healthy. Lactic acid fermented foods are health-promoting, delicious and sooooo easy to make!
Traditionally, cultures around the world have included a small quantity of fermented food in their daily regime. The good bacteria would help to protect their guts against other less desirable pathogens. Pickled foods like pickled radish or cucumbers, and condiments like mustard, always used to be live foods preserved in this method.
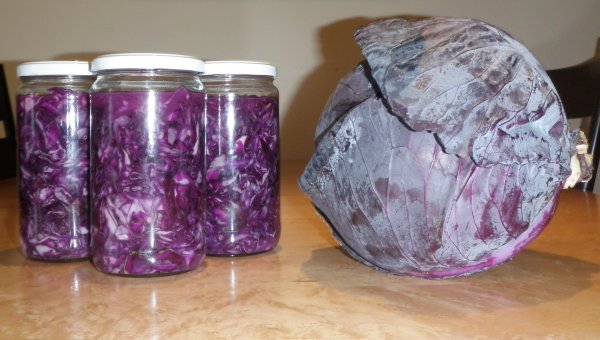
My Nana used to make a large crock of sauerkraut yearly. I embarked on an adventure to turn red cabbage into beautiful purple sauerkraut using a mandolin passed down from my grandparents.
Remember, this is live food so don’t cook it! We often add a spoon of sauerkraut to soups and other dishes, ensuring we add it after the food has cooled enough not to kill the healthful bacteria in the sauerkraut.
I used the recipe out of my standby cookbook “Nourishing Traditions” but the process is pretty simple.
Here’s how I did it…
- Find some local, organic cabbage. Red cabbage is more fun but any cabbage will do.
- Remove the outer leaves. Don’t bother washing it. The bacteria on the outside of the cabbage do the work to make the sauerkraut. Any “dirt” should be removed with the outer leaves.
- Chop or thinly grate the cabbage. I used a mandolin passed down from my grandparents. I put a large pot in the sink then laid the mandolin over top, resting on the sides of the sink.
- As you grate, sprinkle in a bit of course natural sea salt. I used about a tablespoon per cabbage.
- When the entire cabbage is grated, mix well with the salt and, if you have it, add several tablespoons of fresh whey. We get whey from our cow-share dairy farm. They save it from their cheesemaking. It is full of very healthy probiotic bacteria, which contribute to the fermentation process and overall health of the final sauerkraut.
- Then pound the cabbage thoroughly to release the juices. I didn’t have a wooden pounder so I used the end of a wooden spoon. Put some elbow grease into it.
- When the cabbage looks wilted and nice and “juicy”, it’s ready to put in jars.
- I used plain glass jars I had saved from our raw honey consumption. They don’t need to be sterile but they do need to be very clean. So, I washed them thoroughly with soap and hot water, rinsed them and put stood them up in the sink. Then, I boiled water in the kettle and filled the jars with the just-boiled water.
- Fill the cooled jars with the cabbage mixture. Then, pound it down very, very firmly so there are no air bubbles at all. Leave about an inch at the top as it will expand as it ferments.
- Leave the jars out at room temperature for several days. Watch them as they do sometimes leak. After several days, you can simply store them away in a cupboard, in a cool spot in the basement, or in the fridge, if you have room.
Over the course of time, the sauerkraut will mature and get more and more sour. I know people worry about whether it is “safe” or not. But, if something goes wrong and the “bad” bacteria take over the good ones, you will know it—it will smell bad and look mushy, discoloured and bad!